.png)
Ghost Mannequin Photography Guide: Setup, Editing, and Post-Production Workflow
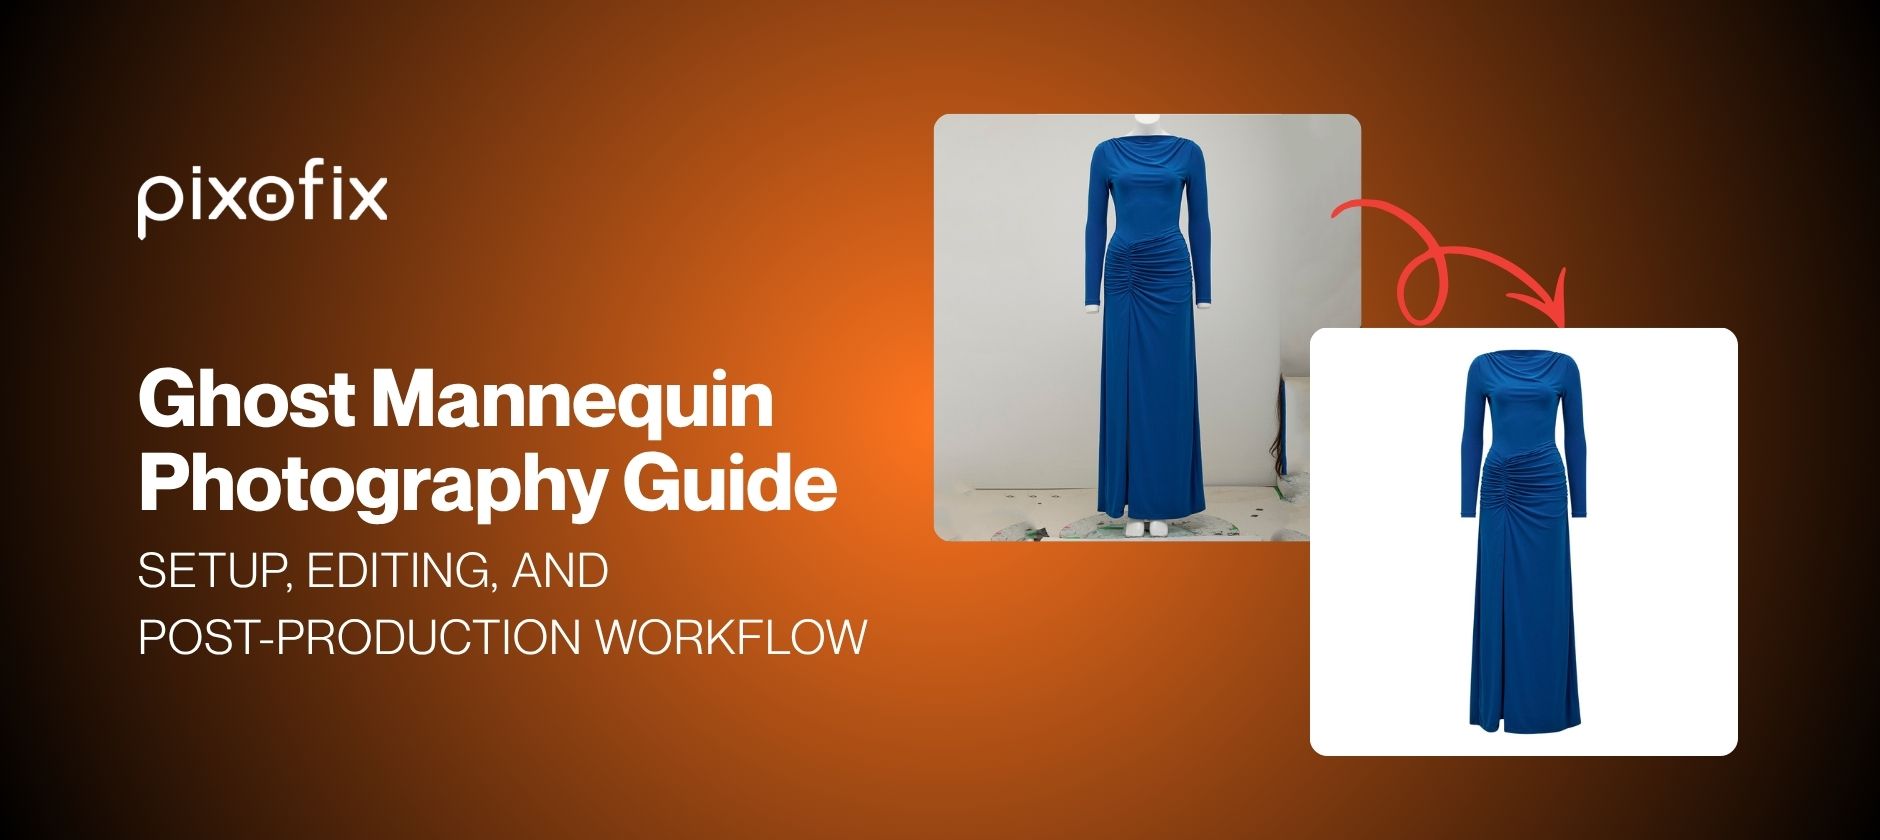
Ghost mannequin photography, also called invisible mannequin photography, is a studio technique that removes the physical mannequin from garment images in post-production, leaving a clean, hollow-form shot that shows the garment's shape, structure, and fit without any stand or model in frame. The ghost mannequin effect is the result of combining a front-facing product shot with a back or interior shot, then compositing them in Photoshop to reconstruct the neckline, hem, and sleeve openings the mannequin was concealing. The output is the standard PDP format for apparel across Shopify, Amazon, Zalando, and most wholesale portals.
For brands managing large SKU volumes, ghost mannequin photography is primarily an operational decision. It standardizes the visual treatment across an entire catalog, reduces per-image shoot time compared to on-model production, and produces files that are immediately compliant with marketplace background and format requirements. This post covers the full workflow: studio setup, equipment selection, shoot execution, Photoshop composite technique, batch QC, and the point at which in-house production gives way to outsourced post-production.
What is the ghost mannequin effect and how does it work?
The ghost mannequin effect is achieved by shooting a garment on a physical mannequin, then removing the mannequin entirely in post-production through a combination of background removal and composite editing. The term "invisible mannequin" refers to the same technique; both names are used interchangeably across the industry, though "invisible mannequin" is more common in European markets and among post-production studios, while "ghost mannequin" dominates in North American ecommerce contexts.
The composite works because the mannequin occludes parts of the garment: the interior neckline, the underside of sleeves, the hem interior. To reconstruct those areas, you shoot the garment from the front on the mannequin, then shoot the back panel or interior separately, either on the mannequin from behind or laid flat. In post, both shots are masked and merged so the final image shows a complete, three-dimensional garment shape with no stand, no neck, and no visible support structure. The result reads as a garment floating in space, which is where the "ghost" terminology originates.
What is the difference between ghost mannequin and invisible mannequin photography?
FoThere is no technical difference. Ghost mannequin and invisible mannequin photography describe the same post-production workflow: shoot on a physical form, remove the form in editing, composite the interior or back panel to fill the occluded areas. The distinction is purely terminological. Some studios and marketplaces use "invisible mannequin" in their style guides; others specify "ghost mannequin effect" or "neck joint retouching," which refers specifically to the composite work at the neckline. For practical purposes, if a brief specifies any of these terms, the deliverable is the same.
Which garment categories benefit most from the ghost mannequin technique?
The technique performs best on structured garments where shape and construction are the primary selling points: tailored jackets, blazers, bodysuits, activewear, swimwear, lingerie, and outerwear. These categories rely on the silhouette to communicate fit and quality. Ghost mannequin isolates that silhouette without the distraction of a model's body or the flatness of a hanger shot.
Unstructured garments, oversized knitwear, and heavily draped pieces are harder to execute cleanly. The mannequin may not fill the garment accurately, which creates wrinkles, collapsed shoulders, or hem distortion that becomes a post-production problem. For these categories, a well-styled flat lay or an on-model shot often produces a more accurate representation of how the garment behaves on a body. Ghost mannequin is not a universal solution; it is the right solution for garments with inherent structure that holds its form on a rigid stand.
Ghost mannequin vs. on-model images: which is right for your catalog?
Ghost mannequin and on-model photography are not competing formats; they serve different functions in a catalog strategy. Ghost mannequin prioritizes the garment: shape, construction, fabric texture, and fit structure are all visible without the variable of a model's body, skin tone, or styling choices introducing noise. On-model photography prioritizes context: how the garment moves, how it fits a specific body type, and how it reads as part of a lifestyle or brand aesthetic. Both have a place in a mature catalog. The decision is which format serves which SKU, and at what production cost.
For high-volume catalogs where every colorway needs a PDP image, ghost mannequin is the operationally correct default. Shooting every variant on a model is expensive, slow, and introduces consistency problems across large batches. Ghost mannequin keeps the visual treatment identical across hundreds of SKUs, which is what marketplace algorithms and brand style guides require. On-model shots are then reserved for hero products, campaign pages, and paid social, where the investment in a full shoot produces higher returns.
When does ghost mannequin outperform on-model photography?
Ghost mannequin outperforms on-model in four specific situations.
First, when the garment's construction is the primary conversion driver. Structured seaming, interior finishes, collar construction, and waistband detail are all more legible in a ghost mannequin image than on a moving body. Buyers making size and quality decisions need to see the garment clearly.
Second, when you are producing at volume. A ghost mannequin workflow can process hundreds of SKUs per day through a structured post-production pipeline. On-model production at the same volume requires booking models, stylists, and studio time for every session, which compounds cost and turnaround time exponentially.
Third, when marketplace compliance is a constraint. Amazon, Zalando, and most major marketplaces specify white or off-white backgrounds with no visible props or models for primary PDP images. Ghost mannequin images are natively compliant with these requirements. On-model shots frequently require additional retouching to pass automated marketplace checks.
Fourth, when colorway consistency matters more than lifestyle context. Ghost mannequin images shot against a controlled background with fixed lighting produce identical framing across every color variant of a SKU. That consistency is difficult to replicate across an on-model shoot where light falloff, model posture, and garment drape vary between frames.
Can ghost mannequin and on-model images work together in the same catalog?
Yes, and for most mid-to-large apparel brands this is the standard approach. Ghost mannequin images cover the full SKU range for PDP compliance and consistency. On-model images are produced for a selected subset of hero products, seasonal campaign pages, email headers, and paid social. The two formats serve different placements in the customer journey and do not compete with each other when the brief is clear.
The operational challenge is maintaining visual coherence between the two formats. Lighting temperature, background treatment, and color grading standards need to be defined at the brand level and applied consistently across both workflows. When ghost mannequin and on-model images from the same brand look like they were produced by two different studios, the catalog loses credibility at the page level. Establishing a unified style guide before production starts, and applying it as a QC checkpoint in both workflows, prevents that problem.
AI-assisted PDP production has introduced a third path worth noting. Brands are increasingly using ghost mannequin shots as the input for AI-generated on-model images, converting a single ghost mannequin asset into multiple on-model variants without additional shoots. The ghost mannequin shot becomes the source file for the full visual range, which changes the cost calculus significantly. Pixofix's AI PDP service is built on this workflow: ghost mannequin or flat-lay input in, brand-consistent on-model PDP images out, across the full catalog.
How does ghost mannequin compare to flat lay photography?
Flat lay is faster to shoot and requires no mannequin or post-production composite work, which makes it operationally attractive for high-velocity content like social, email, and editorial. What it cannot do is communicate garment structure, fit, or three-dimensional form. A flat lay shows fabric and print. A ghost mannequin image shows how the garment behaves on a body. For PDP images where a buyer is making a size and fit decision, flat lay consistently underperforms ghost mannequin on conversion. Most brands use flat lay for content channels where speed and styling flexibility matter, and ghost mannequin for any placement where purchase intent is the goal.
What equipment and studio setup does ghost mannequin photography require?
Ghost mannequin photography does not require a complex studio build, but it does require a controlled one. Inconsistencies in lighting, camera position, or mannequin alignment introduced at the shoot stage compound in post-production. A wrinkle that could have been steamed, a shadow that could have been filled, or a camera angle that drifts two degrees between shots creates hours of additional retouching work across a large batch. The setup standards below are the minimum required for production-grade output.
Camera and lens
A full-frame DSLR or mirrorless body with a tethered connection to a capture station is the professional standard. Shoot in RAW. Use a prime lens in the 85mm to 105mm range to minimize distortion at the edges of the frame; wide-angle lenses introduce barrel distortion that warps garment silhouettes and complicates masking. Mount the camera on a heavy tripod and lock the head between shots. Any camera movement between the front and back panel shots makes the composite measurably harder to align in Photoshop.
Backdrop
A seamless white or light grey paper backdrop is the default. White produces images that are natively compliant with Amazon, Zalando, Shopify, and most major marketplace requirements without additional background work in post. Light grey gives the retoucher more flexibility when adding depth or shadow but requires a background replacement pass before marketplace upload. Avoid textured or graduated backdrops; they create masking complexity with no return.
Color calibration
Shoot a color checker card at the start of every session and after any lighting adjustment. This gives the post-production team a reference point for accurate color grading and ensures consistency across batches shot on different days. Color drift between seasonal uploads is one of the most common quality complaints from brands working with multiple studio sessions.
What type of mannequin produces the cleanest post-production results?
Mannequins with detachable sections produce significantly cleaner composites than fixed-form stands. A mannequin with a removable neck piece, detachable arms, and separable torso panels allows the photographer to expose the interior of the garment at the collar, sleeve opening, and hem without repositioning the entire garment between shots. Each detachable section is photographed separately, then composited in post to reconstruct the complete hollow form.
For most apparel categories, a half-torso mannequin covers the majority of SKUs efficiently. Full-body mannequins are necessary for dresses, jumpsuits, and full-length outerwear, but they increase the complexity of the removal composite, particularly at the hip and leg join points. Skin-tone mannequins in a mid-grey or matte beige finish are easier to mask cleanly than high-gloss white or black forms, which create edge halos in automated selection tools and require more manual masking refinement.
Invest in a mannequin that reflects your brand's fit standard, not just a generic body form. A mannequin sized for UK 10 / US 6 will not represent the fit of a brand whose sizing runs large. Misrepresented fit on PDP images is a direct driver of return rates.
How should you light a ghost mannequin shoot?
The lighting goal for ghost mannequin photography is even, diffuse illumination that reveals garment texture and edge definition without casting hard shadows onto the backdrop or the garment itself. Hard shadows complicate masking and create edge artifacts in the composite that require manual correction.
A three-point setup is the standard starting point: a large softbox or octabank as the key light positioned at approximately 45 degrees above and to one side of the mannequin, a fill light or reflector panel on the opposite side to reduce contrast, and a backdrop light aimed at the seamless paper to keep it clean and even. The ratio between key and fill determines how much depth and shadow the final image carries. A flatter ratio (less contrast) produces images that are easier to composite and more consistent across a large batch. A slightly higher ratio produces more garment texture definition but requires tighter QC on shadow consistency across SKUs.
For transparent, sheer, or metallic fabrics, diffuse lighting from large sources is non-negotiable. Specular highlights from small, hard light sources on these materials create masking problems that are expensive to fix in post at volume. Shoot these categories with the flattest, most even lighting setup your kit allows, and flag them for manual masking in the post-production brief rather than relying on automated selection.
How do you shoot ghost mannequin images correctly?
Correct ghost mannequin photography execution is a preparation and process discipline, not a technical one. The camera settings and lighting setup described in the previous section create the conditions for a clean composite. What determines whether the composite is actually achievable in post is how the garment is prepared, how the shots are sequenced, and how consistently the workflow is applied across every SKU in the batch.
Garment preparation:
Steam every garment before it goes on the mannequin. Every visible wrinkle in the source image is a retouching task in post. For structured garments, use tissue paper or foam inserts to fill areas where the mannequin undercuts the garment's intended silhouette, particularly at the chest, shoulders, and hips. Pin the garment at the back to align seams and eliminate excess fabric, but keep pins completely hidden from the camera angle. Any pin visible in the front-facing shot will require removal in retouching.
Shot sequence per SKU:
Every ghost mannequin SKU requires a minimum of two shots: a front-facing shot with the garment on the mannequin, and a back panel or interior shot that captures the areas the mannequin conceals. For most garments, the interior shot means removing the mannequin's neck piece, photographing the open collar interior, then reassembling for any additional angles. For garments with complex hem or sleeve structure, additional interior shots may be required. Establish the minimum shot list for each garment category before the session starts and document it as a shoot brief the photographer works from.
File naming and metadata:
Label every file at the point of import with the SKU reference, the shot type (front, back, interior, detail), and the colorway. A consistent naming convention eliminates the most common post-production delay, which is the retoucher spending time matching front and back shots from an unlabelled batch. If you are sending files to an external post-production team, this convention is not optional; it is part of the handoff specification.
How many angles do you need to capture per garment?
The minimum viable set for a marketplace-compliant ghost mannequin deliverable is two shots: front composite and back composite. Most apparel brands add a detail shot covering the most commercially relevant feature of the garment, whether that is a collar, a zip, a print placement, or a fabric texture. That gives a three-image set per SKU, which covers the majority of PDP requirements across Shopify, Amazon, and Zalando primary image slots.
For categories where construction detail drives purchase decisions, a more complete shot set is justified. Tailored jackets and structured outerwear typically warrant five to six angles: front, back, side profile, collar detail, interior lining, and a cuff or hem detail. Swimwear and lingerie often require front, back, and a three-quarter angle to accurately represent fit across the body. Define the shot list by category at the start of the season and keep it consistent across all SKUs in that category. Inconsistent angle sets within the same product range create visual incoherence on the brand's category pages.
What are the most common ghost mannequin photography mistakes?
Inconsistent camera distance between front and back shots. If the camera moves even slightly between the front-facing shot and the interior or back panel shot, the composite will not align correctly in Photoshop. The retoucher can compensate to a degree, but it adds time per image and reduces composite precision. Lock the tripod head and do not touch it between shots in the same SKU set.
Garment movement between shots. Removing the mannequin's neck piece or repositioning the garment for the interior shot introduces movement. If the garment shifts on the mannequin between the front and interior shots, the neckline composite will not match. Work slowly and methodically during repositioning, and photograph a reference card alongside each SKU set so the retoucher knows which shots belong together.
Shooting the wrong interior areas. The interior shot needs to capture exactly what the mannequin was concealing: the neckline interior, the sleeve lining, the hem interior. If the interior shot does not cover these areas in sufficient detail and at the correct scale, the retoucher cannot complete the composite accurately. Review the first interior shots of each session on a calibrated monitor before continuing. Catching a framing error on the first SKU saves it from propagating across the entire batch.
Under-steaming structured garments. Collar rolls, shoulder creases, and chest pull are all visible in the final image and all require retouching time to correct. Steaming takes three minutes per garment; retouching a visible crease takes longer. The time cost is always lower at the preparation stage.
Ignoring color reference at the start of the session. Batches shot without a color checker reference cannot be graded consistently in post, particularly when the session spans multiple days or is sent to an external retouching team. This omission creates color drift between SKUs that is expensive to correct at volume.
How do you edit ghost mannequin images in Photoshop?
Ghost mannequin editing in Photoshop is a composite workflow, not a single-step removal. The goal is to produce a final image that shows the complete garment form, front and back, with no mannequin visible, no visible seam between the composite layers, and a clean, isolated subject against the specified background. The steps below describe the standard production workflow for a two-shot composite: front-facing mannequin shot and interior or back panel shot.
What is the composite workflow for neck joint and interior removal?
Step 1: Mask the front shot.
Open the front-facing mannequin shot. Create a precise selection around the garment using Photoshop's Select Subject tool as a starting point, then refine the edge manually using the Refine Edge brush, particularly along collar edges, sleeve openings, and any fine fabric detail at the hem. The automated selection will handle clean edges on structured garments adequately; it will require significant manual refinement on knitwear, sheer fabrics, or garments with fringe or embellishment. Convert the selection to a layer mask. Do not flatten at this stage.
Step 2: Remove the mannequin from the front shot.
With the garment masked, the mannequin is now on a separate layer below. Switch off the mannequin layer. What remains is the garment with the neck, sleeve openings, and any other mannequin-exposed areas showing as transparent. This transparency is where the interior composite shots will be placed.
Step 3: Bring in the interior shot.
Open the interior or back panel shot as a separate layer beneath the masked front garment layer. Align it to the front shot using the neckline, shoulder seams, or hem as reference points. Use Photoshop's Auto-Align Layers function if the camera position was consistent between shots; use manual transform and warp tools where alignment is not exact. The interior shot should fill the transparent areas exposed by the mannequin removal with the correct interior fabric, lining, or structure.
Step 4: Mask the interior layer.
The interior shot contains more than just the area needed for the composite. Mask it down to expose only the portions that fill the transparent areas in the front garment layer: the neckline interior, the sleeve lining visible through the opening, the hem interior. Everything outside these areas should be masked out. Work at 100% zoom for this step; edge quality here determines whether the final composite reads as seamless or shows a visible join line.
Step 5: Refine the neck joint.
The neckline composite join is the most visible point of failure in ghost mannequin editing. Zoom to 200% and inspect the join between the front garment layer and the interior layer along the full collar circumference. Use a soft brush on the layer mask to blend any hard transitions. Add a subtle inner shadow on the interior layer where it meets the collar edge to replicate the depth of the garment's interior structure. Without this shadow, the neckline reads as flat and artificial.
Step 6: Background replacement.
If the backdrop shot was white seamless, automated background removal tools in Photoshop (Select Subject, then invert and delete) will handle most cases cleanly. If the backdrop was light grey or if the garment includes white or near-white elements that approach the backdrop tone, work with the existing garment mask rather than re-selecting. Place a solid white fill layer at the bottom of the stack. Check all edges at 100% zoom for halo artifacts, particularly on light-coloured garments against a light background.
Step 7: Shadow and depth.
A natural drop shadow or ground shadow below the garment gives the image a grounded, finished quality. Use Photoshop's Drop Shadow layer style set to a low opacity (8 to 15%), a large spread, and zero distance to simulate a diffuse, even shadow beneath the garment rather than a directional cast shadow. For brands that require pure white backgrounds with no shadow, skip this step. For D2C storefronts where a subtle depth cue improves perceived quality, it is worth adding.
Step 8: Output and file prep.
Flatten only after all composite work is approved. Export to the specifications required by each channel: JPEG at 72dpi for web upload, TIFF or high-resolution JPEG for print or wholesale portals, PNG with transparency preserved for any channel that accepts it. Name the output file using the SKU reference and shot type established in the shoot brief.
How do you maintain color consistency across a batch?
Color consistency in ghost mannequin post-production is a grading and reference discipline. Every batch should be graded against the color checker reference shot captured at the start of the session. In Capture One or Lightroom, apply a custom profile built from the color checker to every RAW file before they are brought into Photoshop for compositing. This eliminates the ambient light and white balance variation that accumulates across a session and ensures every garment in the batch starts from the same color baseline.
For batches spanning multiple shoot days or multiple studio locations, establish a single "master" image per colorway at the start of the project and use it as the visual reference throughout. Every subsequent image in that colorway is graded against the master, not against the previous image in the sequence. Grading against a chain of images rather than a fixed reference allows color drift to compound across a batch without any single image looking noticeably wrong.
For external post-production pipelines, include the color checker reference shot and the master colorway images in the handoff package alongside the RAW files. A retouching team working without a color reference cannot be held to a color accuracy standard. Pixofix's high-end retouching service operates with brand-specific color profiles established during onboarding, applied consistently across every batch without requiring the client to re-specify color standards on each project.
How do production teams maintain consistency across large SKU volumes?
Consistency at scale is a systems problem, not a talent problem. A single skilled retoucher producing ten images a day can maintain quality through individual judgment. A team processing five hundred images a day across multiple retouchers, shifts, and garment categories cannot rely on judgment alone. The difference between a ghost mannequin pipeline that holds quality at volume and one that degrades as batch size increases is whether the production standards are documented, enforced at intake, and checked at output rather than assumed throughout.
The three operational components that determine consistency at scale are: a standardised shoot brief that prevents variability from entering the pipeline at the source, a pre-production QC gate that catches unusable files before retouching begins, and a post-production QC checkpoint that reviews output against defined acceptance criteria before delivery.
Shoot brief standardisation:
Every garment category should have a documented shoot brief specifying mannequin type, camera distance, lighting ratio, required shot angles, interior capture requirements, and file naming convention. This brief is the retoucher's specification document, not just the photographer's instruction sheet. When a file arrives in post-production that does not conform to the brief, it is flagged and returned rather than retouched with a workaround. Workarounds at scale become inconsistencies at delivery.
Pre-production QC gate:
Before any file enters the retouching queue, a QC reviewer checks that the front and interior shots are present and correctly labelled, that the garment is properly steamed and positioned in the source image, that the lighting is even and the backdrop is clean, and that the color checker reference is included. Files that fail this check are quarantined and flagged back to the studio. This gate prevents retouching time from being spent on files that will require reshoot regardless of how much post-production work is applied.
Post-production QC checkpoint:
Completed composites are reviewed against four criteria before delivery: edge quality at the neckline and sleeve openings, background cleanliness with no halo artifacts or uneven tone, color accuracy against the master colorway reference, and shadow consistency across all SKUs in the batch. A defined rejection rate threshold, typically two to five percent of files per batch, is a normal production metric. Batches with rejection rates above that threshold indicate a systemic problem at either the shoot or the retouching stage that needs to be identified and corrected before the next session.
What does a ghost mannequin QC process look like at scale?
A production-grade QC process for ghost mannequin editing operates on a sample-and-escalate model. Reviewing every image in a five-hundred-file batch at full detail is not operationally viable. Instead, a structured sample review identifies problems early and escalates to full-batch review when error rates exceed the threshold.
The standard sample structure is: review 100% of the first ten files in a new batch or from a new retoucher, then drop to a 20% sample for the remainder of the batch once the quality baseline is confirmed. Any file that fails QC triggers a review of the five files immediately before and after it in the queue, on the basis that errors tend to cluster rather than appear in isolation. If three or more failures are found within a ten-file window, the entire batch goes to full review.
Rejection criteria should be defined in writing and applied uniformly. Common rejection triggers include: visible mannequin artifact at any point in the composite, neckline join line visible at normal viewing distance, background tone inconsistency across files in the same batch, color variance from the master reference exceeding a defined delta, and shadow direction inconsistency within a batch. Subjective rejections, where the retoucher and the QC reviewer disagree on whether an edge is clean enough, are resolved against the master reference image rather than individual judgment.
For enterprise brands running continuous production across multiple seasons, Pixofix structures QC as a dedicated stage in the delivery pipeline, separate from retouching, with a defined SLA for correction turnaround. The output standard is set during onboarding and applied without re-briefing on every subsequent batch, which removes the most common source of quality drift in high-volume post-production relationships: the client having to re-explain their standards every time a new project starts.
When does it make sense to outsource ghost mannequin editing?
The decision to outsource ghost mannequin editing is an operational threshold question, not a quality preference. Most in-house design teams can produce competent ghost mannequin composites for small batches. The point at which outsourcing becomes the correct operational decision is when the volume, turnaround requirements, or consistency standards of the production exceed what an in-house team can sustainably deliver without becoming a bottleneck.
Four indicators that the threshold has been crossed:
Volume exceeds in-house capacity during peak windows.
Fashion brands concentrate uploads around seasonal drops, new collection launches, and marketplace onboarding deadlines. An in-house retoucher producing thirty to fifty images per day cannot absorb a five-hundred-image upload window in a week without either missing the deadline or degrading quality. A production partner with dedicated capacity and a parallel retouching workflow can absorb those spikes without affecting the rest of the production schedule.
Consistency is degrading as batch size increases.
If QC rejections are rising, color drift is appearing between SKUs in the same batch, or neckline quality is inconsistent across a seasonal upload, the problem is systemic rather than individual. An external partner with a structured QC pipeline and defined acceptance criteria will hold quality more reliably at volume than an in-house team managing the same workload without dedicated QC infrastructure.
Turnaround requirements are compressing.
Same-day or next-day turnaround on large batches is not achievable with a small in-house team. If your production schedule requires files to be marketplace-ready within 24 to 48 hours of the shoot, you need a partner with the staffing and workflow infrastructure to meet that SLA consistently, not occasionally.
In-house retouching is pulling skilled staff off higher-value work.
Ghost mannequin compositing at volume is a production task, not a creative one. If your senior retouchers or art directors are spending significant time on mechanical composite work, that is a resourcing misalignment. Outsourcing the production layer frees those staff for work that requires creative judgment: campaign retouching, color grading, and visual development.
For brands at this threshold, the evaluation criteria for a ghost mannequin service provider are straightforward: verified volume capacity, a documented QC process, a defined turnaround SLA, and a sample batch that demonstrates consistent output across different garment categories before any volume commitment is made. A provider that cannot demonstrate all four before onboarding is not ready for production-scale work.
For a structured comparison of the leading ghost mannequin service providers across these criteria, see the best ghost mannequin services guide.
Running ghost mannequin at volume and need a quality benchmark before committing to a production partner? Request a free sample and receive edited images from your own garments within 48 hours, no commitment required.. Get Your Free Sample.


.png)
.png)