.png)

Accessories Product Photography Retouching: Playbook for Ecommerce Teams
Accessories Product Photography Retouching
Why Detail Sells
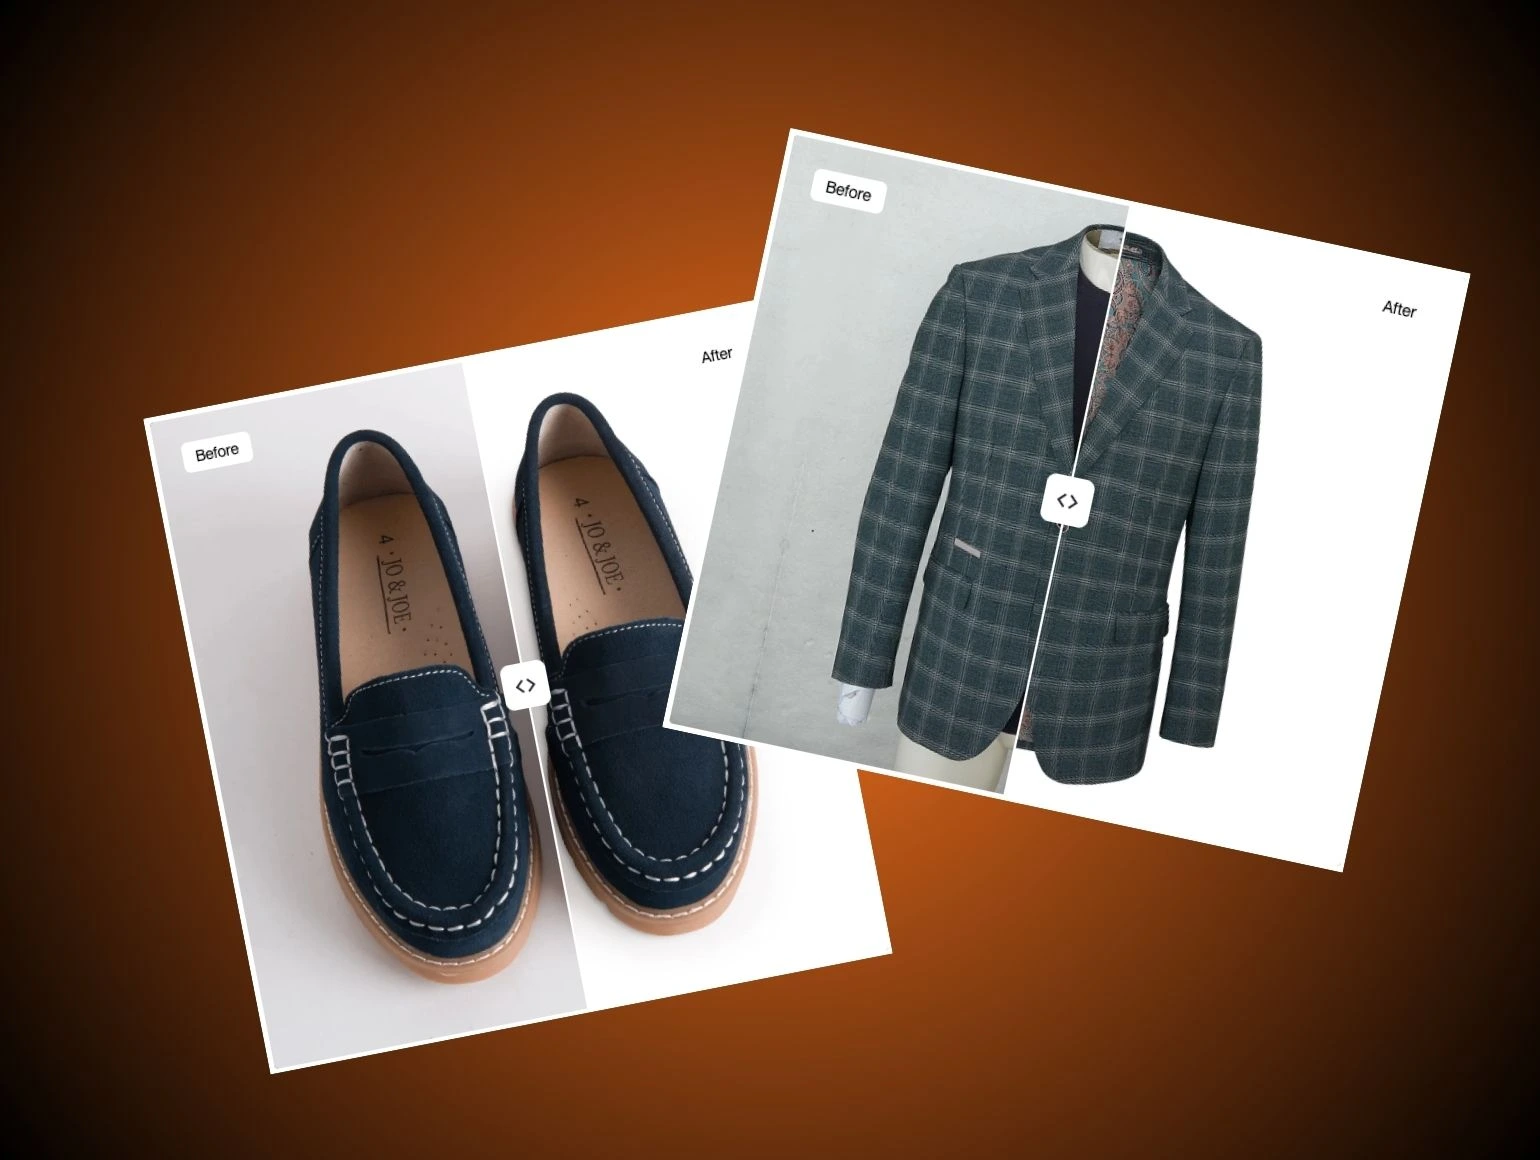
Accessories win attention through precision. Stitching, grain, hardware, and edge shape all influence whether a shopper trusts the image. In ecommerce, small defects become big doubts. Clean post-production keeps the product believable while still looking refined.
When the source file is weak, the edit has to do more than clean dust. It has to correct color drift, restore structure, and protect the material finish. That means retouchers need a repeatable system, not one-off fixes. Pixofix teams often build that system around capture discipline, edit rules, and QC loops.
What Buyers Notice
Shoppers zoom in fast. They inspect buckles, zipper teeth, strap symmetry, logo placement, and the way leather reflects light. If any of those cues feel off, the item reads cheaper than it is. That hurts click-through and adds friction before checkout.
The most common visual failures are subtle. A warm cast can make tan look orange. A hard highlight can flatten chrome into something toy-like. A blurred stitch line can suggest weak construction. The fix is targeted retouching, not blanket smoothing.
Accessories Product Photography Retouching For Bags
Keeping Structure Intact
Bags are where shape control matters most. Soft totes collapse. Structured satchels bow at the side panels. Handles twist under poor handling. Retouching should restore the intended silhouette without making the item look manufactured from plastic.
Use path-based selections to isolate the body, handle, and gusset. Then correct only the distorted regions. Local warp tools are safer than global liquify because they protect the natural line of the leather grain. For ghost mannequin composites, keep strap joins aligned and avoid artificial rounding at shoulder contact points.
Handling Leather Grain
Leather is unforgiving. Over-cleaning removes the subtle texture that makes the product feel premium. Under-cleaning leaves dust, scuffs, and handling marks that show up immediately on high-resolution PDP images. The goal is to preserve grain while clearing distractions.
A practical method is frequency separation with restraint. Keep the high-frequency texture layer intact and clean defects on a separate layer. If the grain starts to look waxy, back off. That is especially important on pebbled leather, saffiano, and coated finishes where surface detail carries most of the perceived value.
Matching Brand Colorways
Bags often launch in multiple colorways, and consistency across the set is non-negotiable. One skewed olive or navy can make the entire collection feel mismatched. The best safeguard is a master reference shot captured under controlled light with a color card in frame.
In post, lock the profile before batch corrections. Then compare each SKU against the master under the same viewing conditions. This is where Pixofix can help teams maintain repeatable output during large seasonal drops. Keep the correction subtle. A shopper should feel the color is accurate, not digitally improved.
Accessories Product Photography Retouching For Belts
Buckles And Shine Control
Belts create a different editing problem. The strap may be simple, but the buckle is usually reflective and highly visible. Chrome, brass, and gunmetal each behave differently under studio lights. If the retouch is too aggressive, metal turns flat. If it is too loose, you keep unwanted glare and camera reflections.
Use masked highlight control on the hardware only. Dodge and burn can restore a believable reflection path without painting over the metal’s shape. If a buckle edge is distorted, correct the geometry before adjusting shine. That sequence preserves form and avoids a fake finish.
Straightness And Edge Cleanup
Belts photograph with tension, so curve and twist are common. Crooked edges make the item look warped, even when the product itself is fine. Side edges, punched holes, and stitched borders all need careful alignment.
A clean workflow starts with a full-length reference and a verified flat lay. Then use guide overlays to check the belt line against the frame. If the strap bends because of setup, correct the warp locally. Avoid over-sharpening the cut edge, because it makes the leather border look brittle.
Punch Holes And Stitch Detail
Small repeating details reveal poor retouching quickly. Punch holes can smear. Stitch lines can disappear. The fix is not more sharpening across the entire file. It is selective repair at the defect level.
Zoom in and rebuild the missing detail with clone and stamp only where necessary. When holes are meant to be perfectly spaced, measure the interval before editing so the spacing stays believable. This kind of micro-correction is one reason accessory retouching benefits from human QC rather than full automation.
Accessories Product Photography Retouching For Small Goods
Wallets And Cardholders
Small goods have the hardest edges to maintain. At close range, a tiny warp can make the item look misshapen. Wallet corners, fold seams, and card-slot openings all need controlled cleanup. If you are shooting for ecommerce, keep the original construction visible.
Macro capture helps, but it also exposes everything. That means dust, fringe, and stitching fuzz show up more clearly. Retouch in a way that keeps the leather edge defined. A good rule is to remove distractions first, then refine the outline, then recheck the stitch track. Skipping that order often leads to soft, artificial results.
Scale And Proportion
Scale is especially tricky with compact items. A cardholder can look larger or smaller than intended if framing is inconsistent. Buyers use relative size as a quality cue, so every crop should be deliberate. The same product should sit in the same visual zone across the collection.
Use a measurement reference during capture and preserve it through editing if the layout allows. If not, keep the crop ratio and camera angle consistent from SKU to SKU. That makes the catalog feel controlled and reduces post-production bottlenecks later in the pipeline.
Texture Mapping Issues
Texture mapping errors show up fast on embossed logos, grain direction, and stamped patterns. Even strong AI tools can misread those surfaces. When a pattern bends incorrectly, the product loses credibility. This is one of the clearest areas where manual correction still outperforms automation.
For small goods, use layered retouching to separate texture from shape. Keep logo relief crisp, then repair the surrounding surface around it. If a raised mark has become muddy, rebuild the edge with hand-painted detail rather than a broad smoothing pass.
Accessories Product Photography Retouching For Materials
Reflective Surfaces
Patent leather, acrylic, coated canvas, and polished metal all behave differently under light. These surfaces can double unwanted reflections and create busy highlights that distract from the product. The retouch should reduce clutter while keeping the item physically believable.
When the reflection includes the set, isolate the problem area and rebuild the specular line only where needed. Gradient masks and careful compositing are usually safer than a broad AI cleanup. Current generative video and still-image tools can still miss the logic of curved reflections, especially on fast-moving product lines with many finishes.
Transparent Elements
Transparent parts are a frequent problem in accessory editing. Clear handles, plastic windows, and semi-opaque trays can confuse cutout tools. If the background edge is wrong, the product looks floating or clipped. That damage is noticeable even on small thumbnails.
Manual pathing is often the cleanest route. Build the edge with channels or pen tool work, then refine the transition where the material catches light. Keep the transparency believable by preserving the faint edge gradient. Removing too much edge information makes the item look pasted on.
Mixed Material Composites
Many accessories combine leather, metal, fabric, and plastic in one frame. That mix raises the difficulty because each material needs different treatment. A blanket edit usually breaks at least one surface. The correct approach is layer separation by material type.
Retouch the matte portions first, then the reflective hardware, then the transitional zones where materials meet. This reduces the chance of halos around seams and logos. It also improves SLA adherence when teams need predictable turnaround on large asset sets.
Workflow For Accessories Product Photography Retouching
Start With Capture Control
Editing quality begins before retouching. If the set is poorly lit or the product is not supported correctly, post-production becomes expensive and slow. Use reference cards, consistent focal length, and stable support for every SKU batch. That gives the retoucher a cleaner baseline and fewer surprises.
A capture brief should name the material, finish, intended crop, and shadow style. Include one hero reference and one side reference per product family. This reduces guesswork and shortens review cycles. It also helps maintain a consistent look across colorways.
Clean In Logical Order
A stable retouch order avoids backtracking. Start with exposure and color. Then remove dust, fingerprints, and set debris. After that, adjust shape, edge fidelity, and hardware shine. Finish with shadows and export prep.
That sequence matters because early corrections affect later ones. If you retouch shadows before correcting the silhouette, you will likely rebuild them again. Keep the file organized with named layers and grouped edits. Good file structure prevents rework when multiple retouchers touch the same asset.
Build QC Loops
QC loops catch the problems that are easy to miss at speed. Common review points include grain preservation, logo clarity, edge halos, and crop alignment. Review at both normal size and high zoom. A file can look fine at fit-to-screen and still fail at pixel level.
Set approval checkpoints by asset type. Hero shots need stricter review than internal catalog variants. For teams working at volume, Pixofix can sit inside the review process to standardize comparison against the master reference. That reduces subjective approval and keeps the output consistent.
What To Avoid
Over-Smoothing Surfaces
Too much smoothing is one of the fastest ways to damage an accessory image. Leather begins to look coated. Fabric loses weave. Hardware loses depth. The product ends up looking less expensive, not more premium.
Use selective cleanup instead. Keep the tactile layer visible and remove only the defects that do not belong on the item. If the surface starts resembling a plastic render, the edit has gone too far. Pull back and compare against the studio reference.
Fixing Shape Globally
Global warps create new problems while solving old ones. A strap can become too narrow. A bag body can lose volume. A wallet corner can turn unnatural. Shape corrections should stay local unless the entire frame is off.
Use anchor points and regional transforms to fix the issue in place. Then recheck the surrounding stitch line and shadow alignment. That keeps the product looking physically assembled rather than digitally stretched. It is slower, but it is the safer route.
Ignoring Hardware Reality
Hardware is often the first place where poor retouching shows. Over-brightening turns metal into mirror glare. Flattening removes the sense of weight. Misplaced highlights make buckles look detached from the product.
Work from the real reflection path. Keep the brightest point where the light would actually strike. If a highlight is covering important design detail, reduce it with a mask rather than deleting it entirely. The goal is believable shine, not perfect shine.
Letting Color Drift
Color drift across a product line creates confusion. A neutral bag should not shift from taupe to beige to gray across nearby shots. That inconsistency weakens trust and complicates channel merchandising.
Use one master profile and keep reference capture visible during final adjustments. Check adjacent SKUs as a group, not one at a time. When possible, compare the final image with the physical item under neutral light. That simple habit prevents many approval delays.
Metrics That Matter
Cost Per Image
Cost per image shows how much effort the workflow consumes. Track it by product type, because a belt buckle is not the same as a bag body or a transparent cardholder window. A simple cleanup file should cost less than a hero composite. If costs rise, the issue is usually capture quality, review churn, or inconsistent file prep.
Days From Shoot To Live
Days from shoot to live measures the real speed of the pipeline. It is the best indicator of how well capture, retouching, and approvals work together. Track both the average and the outliers. One difficult batch can reveal weak handoff rules or missing references.
Revision Rate
Revision rate tells you how often files come back for rework. High revision volume usually means the brief was incomplete or the edits missed a brand rule. Break this down by category, such as bags, belts, and small goods. That helps the team see where training or better QC is needed.
Approval Time
Approval time shows whether stakeholders can review efficiently. Long delays usually come from unclear version naming, inconsistent crops, or missing comparison files. Use a clean naming system and keep the reference alongside the retouched image. Faster approval is often a process issue, not an edit issue.
Consistency Score
Consistency score can be measured by comparing crop ratio, shadow angle, color response, and edge treatment across a set. This is useful for large launches with many colorways and angle variants. A strong score means the catalog feels unified. A weak score means customers see a patchwork of styles.
Return Reasons Linked To Imagery
Track return reasons that mention color, size, finish, or detail mismatch. Those are the image-related signals that matter most. If a specific batch shows repeated complaints, review the retouching chain from capture through approval. That feedback loop gives the team evidence for process changes.
Retouching Techniques That Work
Clipping Paths
Clipping paths are still essential for clean background control. They are especially useful when the product edge needs to stay sharp through multiple exports. Use them for marketplace compliance, campaign resizing, and catalog swaps. They are not the fastest method, but they are reliable.
Ghost Mannequin Composites
Ghost mannequin work helps show shape without adding model distraction. It works well for structured bags and some soft accessories where the internal form matters. The key is matching the join line precisely and keeping strap geometry natural. Poor alignment is obvious immediately.
LoRA Training
LoRA training can help custom workflows, but it has limits on fine accessories. It may produce acceptable batch concepts, yet it still struggles with micro-details like stitch spacing, jewelry-level hardware accuracy, and shoulder structure in on-model shots. Use it as a support tool, not a final truth source. For catalog-grade output, human correction remains necessary.
Post-Production Bottlenecks
Bottlenecks usually appear at color review, version naming, and final QA. They also show up when teams mix styles without a shared master profile. Clear handoff rules and standardized templates reduce friction. When the process is predictable, retouchers spend more time on actual image quality.
Virtual Models
Virtual models can support planning and alternate presentations, but they are not a full replacement for accurate stills. They often struggle with hand placement, jewelry fit, and shoulder structure. That is why product images still need careful retouching even when AI-generated previews are part of the workflow. Use them for exploration, not for final catalog trust.
Building A Repeatable System
Keep One Master Reference
Every accessory family should have a verified reference image. This creates a fixed point for color, crop, and material interpretation. Without it, each retoucher makes a slightly different judgment. Over time, that drift becomes visible in the catalog.
Store the reference with the raw files and the approved final. Include notes on lighting angle, shadow type, and any manual corrections that were applied. That documentation makes reorders and extensions much faster. It also helps new editors match existing work.
Standardize File Prep
File prep saves more time than most teams expect. Rename files consistently, group by SKU, and keep versions separate from finals. Embed the correct profile before editing starts. These steps cut down on confusion during approvals and exports.
A well-prepped folder also helps batch automation. Retouchers can move faster when they are not searching for the correct angle or reference. The benefit compounds on large drops. Cleaner inputs produce cleaner outputs.
Use Human Judgment Early
Automation is useful, but it should not be trusted blindly. AI cleanup can miss embossed logos, distort hands in lifestyle scenes, and warp shoulder structure on bag composites. It may also over-smooth texture in ways that are hard to reverse later. Catch those issues early, before they spread through the export set.
The best teams use automation for repetitive cleanup and human review for judgment calls. That includes hardware shine, color accuracy, and edge fidelity. When teams split those tasks properly, quality goes up and revision churn goes down. Pixofix is most useful when it is part of that layered process.


.png)
.png)