.png)
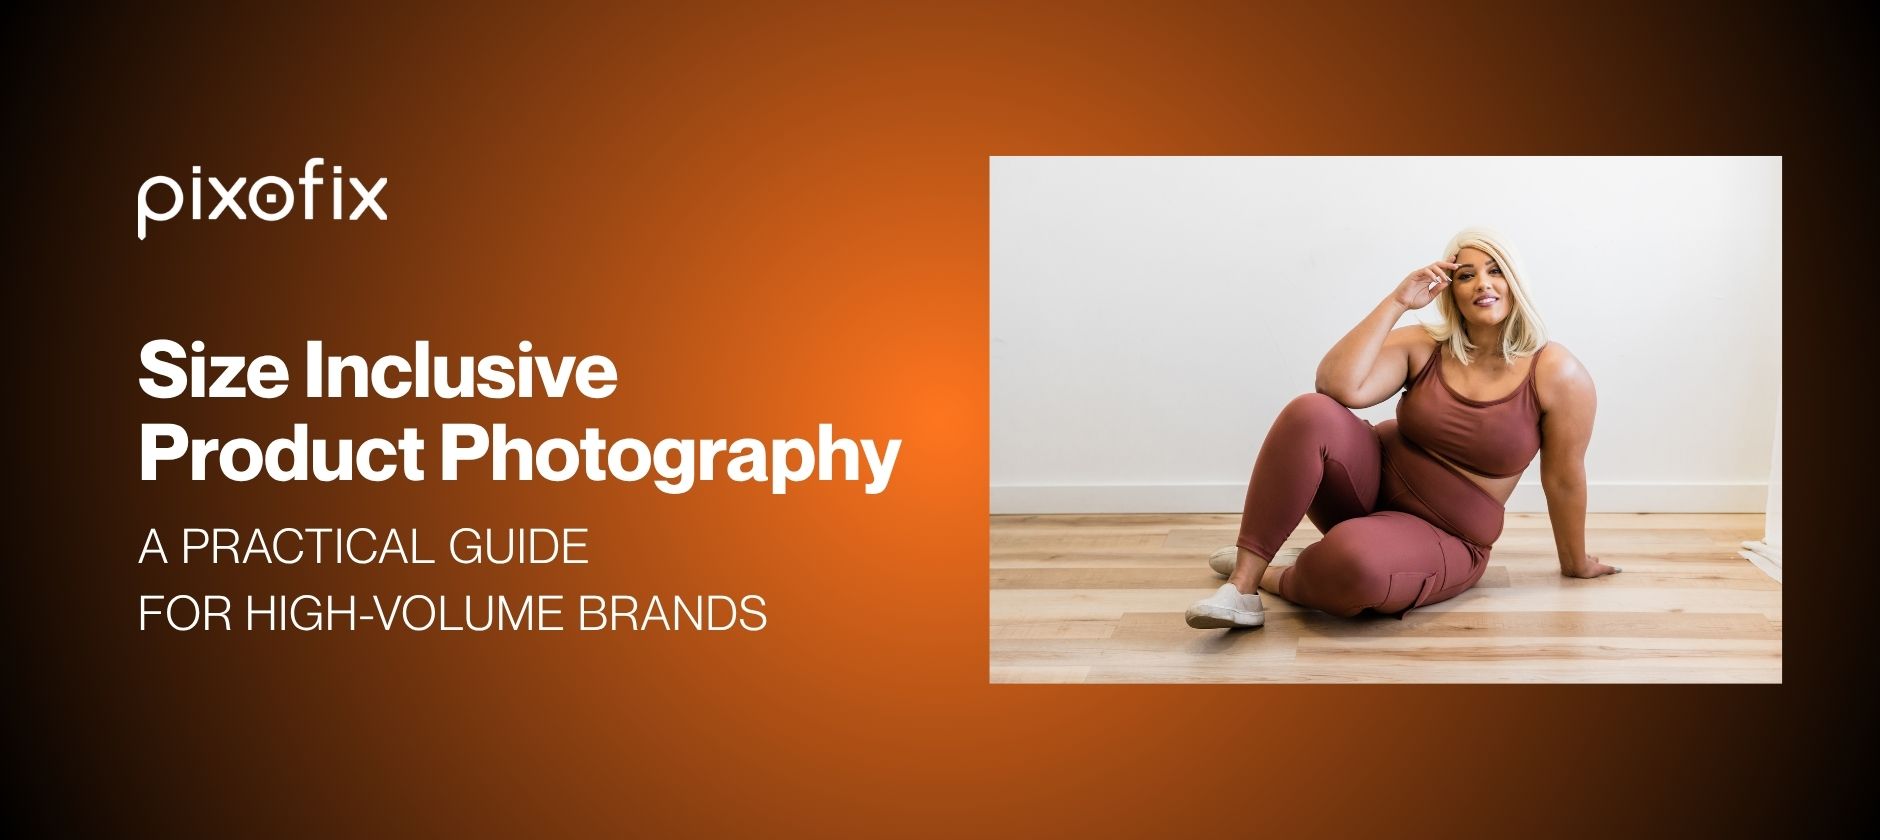
Size Inclusive Product Photography at Catalog Scale: A Practical Guide for High-Volume Brands
Size inclusive product photography is the practice of accurately representing garments across the full range of sizes and body types a brand sells, using standardized capture, graded fit references, and consistent post-production to ensure every shopper sees imagery that reflects how a product will actually look on their body. In an ecommerce production context, that means aligning photographers, stylists, retouchers, and AI tools around the same technical rules, so the size 4 PDP and the size 22 PDP read as part of the same honest catalog.
Most ecommerce PDPs misrepresent fit, not by intent but by process. Once you push thousands of SKUs per month through a single set of models, poses, and angles, then try to fix size inclusivity later, the system fractures. Size inclusive product photography only works when the workflow is engineered for accuracy across the full size range from the start, not bolted on after the base sample is done.
Anyone running a fashion studio at volume feels the tension. You need accurate representation across sizes to cut fit anxiety and returns. You still must hit SLAs, protect budgets, and keep a stable production calendar. Reshooting every size on every body is commercially impossible. Pure AI is not the answer either. You get stable results when you combine disciplined capture with a hybrid pipeline that uses AI for speed and human expertise for QC.
What Is Size Inclusive Product Photography
Size inclusive product photography means more than adding plus-size models to a shoot. In a production context it means the following:
- Graded fit is visually accurate across every size shown, not just the base sample size.
- Drape, stretch, hem length, rise, and waistband tension reflect what a shopper in that size will actually experience.
- Lighting, color, and camera angles are consistent across the full size run, so no size block looks like a different product.
- Post-production, whether human or AI-assisted, enforces fit rules derived from the technical spec, not from aesthetic preference.
Brands that treat size inclusive product photography as a styling decision rather than a production systems decision almost always see the same results: higher returns in extended sizes, lower repeat purchase from shoppers who felt misled, and QC crises that surface after launch rather than before.
Why Size Inclusive Product Photography Breaks at Scale
Map the Operational Bottleneck
Start with the constraint, not the ideal campaign deck. Your bottleneck is rarely camera time. It is model availability, changeover time, and post-production throughput. Once you reach 500 to 10,000 plus SKUs per month, the invisible ceiling is your ability to keep angles, lighting, and retouch standards consistent across complete size runs.
If you push size inclusivity only at the shooting stage, your schedule blows up. If you push it only in post, your QC loops blow up. The real bottleneck sits where capture and post-production meet, where choices about which sizes and bodies are actually photographed limit what can be done accurately without a reshoot. Map that seam explicitly, then design capture and post steps that support each other.
See Why Reshoots Spiral
Reshoots usually fail operationally, not creatively. They spiral because the original plan never reserved time or budget for full size coverage. You shoot a single model in size S or M, one angle per view, then discover during Product Detail Page Best Practices build that extended sizes look wrong, pixelated, or off proportion when simulated.
At scale, every reshoot tears into SLA adherence. One broken batch can push 300 SKUs off calendar and create a backlog in both Capture One sessions and retouch queues. Multiply that by seasonal drops and multiple colorways and the math collapses. You cannot reshoot your way to size inclusivity once you are operating at catalog scale. You need a production design that anticipates extended sizes from day one.
Define Accuracy Across Sizes
Accuracy for size inclusive product photography is not just "more models." It is whether a shopper can trust that the drape, stretch, and proportion in their size will resemble what they see. That includes hem lengths on different heights, waist rise against torso length, and how volume distributes across hip, bust, and shoulder.
Create a working definition of visual accuracy that photographers, stylists, and retouchers can execute. For example, "inseam reads correctly at ankle on all size blocks" or "armhole depth remains true to graded spec on all virtual models." Turn these into technical notes that guide both human retouch and AI generation workflows. Then audit imagery against those rules instead of subjective preferences.
Build Accuracy Into Capture
Standardize Lighting and Angles
If capture is inconsistent, no AI or human can fix sizes cleanly without side effects. Lighting drift across days alters perceived volume on identical garments. Shadows deepen in one batch, highlights clip in another, and suddenly your size 14 looks denser than your size 18 purely because the key light shifted.
Lock a technical playbook for each product type. Document camera height, lens choice, distance to subject, and standard angles for primary PDP views. Use metered lighting and fixed ratios so your retouch team is not fighting exposure variance on every size block. Texture mapping in AI tools and manual work on fabrics like satin, silk, coated denim, and high-stretch knits all depend on predictable lighting to keep apparent depth and stretch honest.
Photograph Fit-Critical Views
A single frontal shot carries almost no fit information. Back, side, and a minimal set of detail crops reveal how a garment actually behaves on different bodies. Focus on waistbands, armholes, side seams, inner thighs, and closure tension points.
Prioritize views that show strain, drape, and volume distribution. For jeans, that means back yoke, seat, and thigh. For structured blazers, that means shoulder slope, lapel roll, and button stance. These angles give retouchers and AI systems real data for how fabric falls, which is essential when adapting a base shot for other bodies or sizes without reshooting. Treat these views as mandatory for silhouettes with known fit risk.
Capture Reference Assets for Retouching
Reference capture is cheap compared to reshooting looks. Pull fabric swatches, close-ups of key construction points, and even short generative video clips of movement for problematic fabrics. These may never appear on PDP, but they become ground truth for post-production.
Retouchers can use close-ups to calibrate skin tone grading against garment color, reduce color drift across batches, and preserve texture detail. Feed these assets into AI pipelines, for instance LoRA training for specific fabric behavior or shine. Your synthetic outputs then track reality more closely. Without photographic references, AI tools guess, and they guess wrong just often enough to erode trust at PDP scale.
Grade for Real Fit
Separate Sizing from Styling
Size inclusive product photography collapses when styling hides true fit. Pinning a size 12 sample on a size 4 model and then "fixing" that in post distorts both body and garment. It might pass for editorial, but not on PDPs where shoppers expect imagery to reflect graded specs.
Draw a sharp boundary between sizing and styling. Styling may adjust sleeve rolls, cuff length, or add accessories. It cannot shift where a garment sits on the body or how it hangs. Document any aggressive pinning, tucking, or clamping so retouchers know what is real and what is constructed. That documentation is also critical for building AI training sets that respect actual fit.
Check Proportions by Size Block
Do not treat sizes as a smooth gradient. Treat them as blocks. The way a pattern moves from 0 to 8 differs from how it behaves between 10 and 18 or above. Grading is mathematically linear on the tech pack, yet visually it is not. Hip-to-waist curves, bust apex, bicep circumference, and rise length all shift differently across ranges.
For each size block, run a quick proportional check. Compare on-figure images or fit photos against graded measurement charts. Note where images diverge from spec, for example sleeves appearing shorter than measured because of model arm length. Correct these discrepancies consistently in retouch or AI outputs. Otherwise your size 6 PDP will visually contradict your size 18 even if the base pattern is sound.
Flag Shapes That Cannot Scale Linearly
Some silhouettes do not scale cleanly across all sizes. Ultra-low rise, micro-crops, extreme cutouts, corsetry, and exaggerated oversize pieces hit visual or technical limits very quickly. If you attempt to extend these purely in post, they often look uncanny or dishonest.
Flag such shapes early and decide where you need real photography rather than digital adaptation. You might allow AI in Post Production for straight-leg denim or T-shirts, but insist on live extended-size coverage for bandage dresses, sculpting bodysuits, and tailored suiting above a given size. Make that decision deliberately during line planning instead of scrambling during QC.
Use Model Coverage to Reduce Guesswork
Pair Base Sizes with Key Extensions
You do not need every size photographed, but you do need anchors. A pragmatic pattern is to shoot at least one core sample size plus one or two anchors in adjacent blocks. For example, 4 and 16, or S and XXL, depending on your scheme.
These anchors reduce guesswork when adapting imagery manually or with virtual models. They show how volume and proportion actually change across bodies. From there, retouchers can interpolate intelligently, and AI tools can be guided with constraints such as side seam position, waistband angle, and shoulder slope that must remain consistent across synthetic variants.
Match Model Body to Shopper Need
Size inclusive product photography is not only horizontal across sizes. It is vertical across body types. Curvy, straight, tall, petite, athletic, and plus each create different fit narratives. A size 12 with narrow hips and a size 12 with fuller hips both "fit," yet they look very different.
Map model body profiles to your primary shopper segments, not just numeric sizes. Anchor base shots on those body profiles. This gives production teams and AI workflows realistic targets for body shape. Garments can then be visualized accurately on the bodies that actually buy them, rather than only on reference models with atypical proportions.
Avoid the Plus-Sizing Effect
One familiar failure mode in AI model shot generation is the "plus-sizing effect." The body enlarges, but garment fit does not adjust correctly. Waistbands float, shoulder seams stay in the wrong place, and compression fabrics lack realistic tension. The result feels subtly false even if the image looks polished.
Prevent this by tying garment fit rules to each body type, not only scaling the human mesh. Define that in extended sizes the waistband should sit lower under tension, that bust dart points and princess seams shift, or that sleeve ease increases visibly. Retouchers must enforce these rules, because tools such as Midjourney, Flux Pro, and Stable Diffusion often favor flattering silhouettes over pattern accuracy unless constrained aggressively.
Which AI Tools Support Size Inclusive Product Photography
AI tools are now central to high-volume size inclusive product photography workflows. They are not interchangeable. Each has different strengths and specific failure modes when applied to body diversity and garment fit accuracy.
Runway Gen-4
Strong for video and motion-based garment visualization. Useful for showing stretch behavior and drape on extended sizes. Weakness: garment edge definition softens at larger body volumes, requiring human correction on seam lines and hem breaks before PDP use.
Imagen 3 (Google)
Produces high photorealism for static on-body shots. Handles skin tone diversity well across a wide range. Weakness: waistband geometry and compression garment tension are inconsistently rendered in extended sizes. Needs retoucher correction on tight-fit silhouettes.
Flux Pro
Fast and prompt-responsive. Works well for straight-leg and boxy silhouettes where grading changes are relatively minor. Weakness: princess seams and fitted torso pieces often show incorrect apex placement on fuller busts unless LoRA models are trained specifically for those shapes.
Stable Diffusion (with LoRA)
The most controllable option for size inclusive product photography at catalog scale. LoRA models trained on brand-specific fabric references and fit photos significantly reduce the proportion drift and garment floating seen in base models. Weakness: requires investment in training sets and prompt engineering before it produces catalog-consistent results. Not plug-and-play.
Midjourney
Best for ideation and creative concepting. Not suitable as a primary tool for size inclusive product photography at catalog scale. Consistently favors idealized body proportions and will smooth fit artifacts that should be preserved, such as realistic waistband tension or bust ease.
When Human Retouching Must Take Over
Regardless of tool, human retouchers must control the following regardless of AI output quality:
- Neckline and shoulder geometry on ghost mannequin shots across size runs
- Hand placement, finger separation, and wrist joint rendering
- Jewelry reflections and metallic trim behavior
- Compression garment tension and stretch fabric elasticity
- Skin tone accuracy under studio lighting, especially across mixed AI and photographic assets in the same batch
The threshold is simple: wherever a mistake would cause a shopper to return the item citing "did not look like the photo," a human must review and approve.
Production Method Decision Matrix
Use this matrix to decide which production method fits each silhouette and size range. Cost and speed are relative to a full reshoot baseline.
This matrix should be reviewed by category during line planning, not decided at post-production intake. Creative directors and operations leads who set these rules early prevent the QC crises that happen when the wrong method is applied to the wrong silhouette under deadline pressure.
Use AI Plus Human QC to Scale Consistency
Let AI Handle Speed
AI is very efficient at first passes. Feed in flat-lay shots, pattern outlines, ghost mannequin frames, and fabric swatches, and you can produce virtual models and on-body views in minutes. Tools like Runway Gen-4, Imagen 3, Stable Diffusion, and Kling all produce strong single images from minimal input.
At 1 to 10 images, the results look acceptable. The weakness is not single-image quality. It is run-to-run consistency. Prompts drift, lighting shifts, shadow shapes move, and edges warp slightly from batch to batch. At small volumes this is tolerable. Once you reach hundreds or thousands of SKUs per month, it turns into a QC problem that swallows retouch and approval capacity.
Let Retouchers Control Consistency
Human retouchers excel at enforcing rules that AI still breaks, especially over time. That includes realistic skin under studio lighting, precise hem length corrections, and keeping ghost mannequin photography necklines and shoulders identical across size runs. AI models often hallucinate shoulder slopes, neckline shapes, and side seam curves, particularly on ghost mannequin imagery, which causes subtle distortion for each size.
Retouchers are also better at tough details such as jewelry reflections, hair intersections, and hand and finger anomalies that generative tools frequently introduce. When you channel AI outputs into a team trained to correct these issues against a style guide, your catalog begins to read as a single system instead of many experiments pasted together.
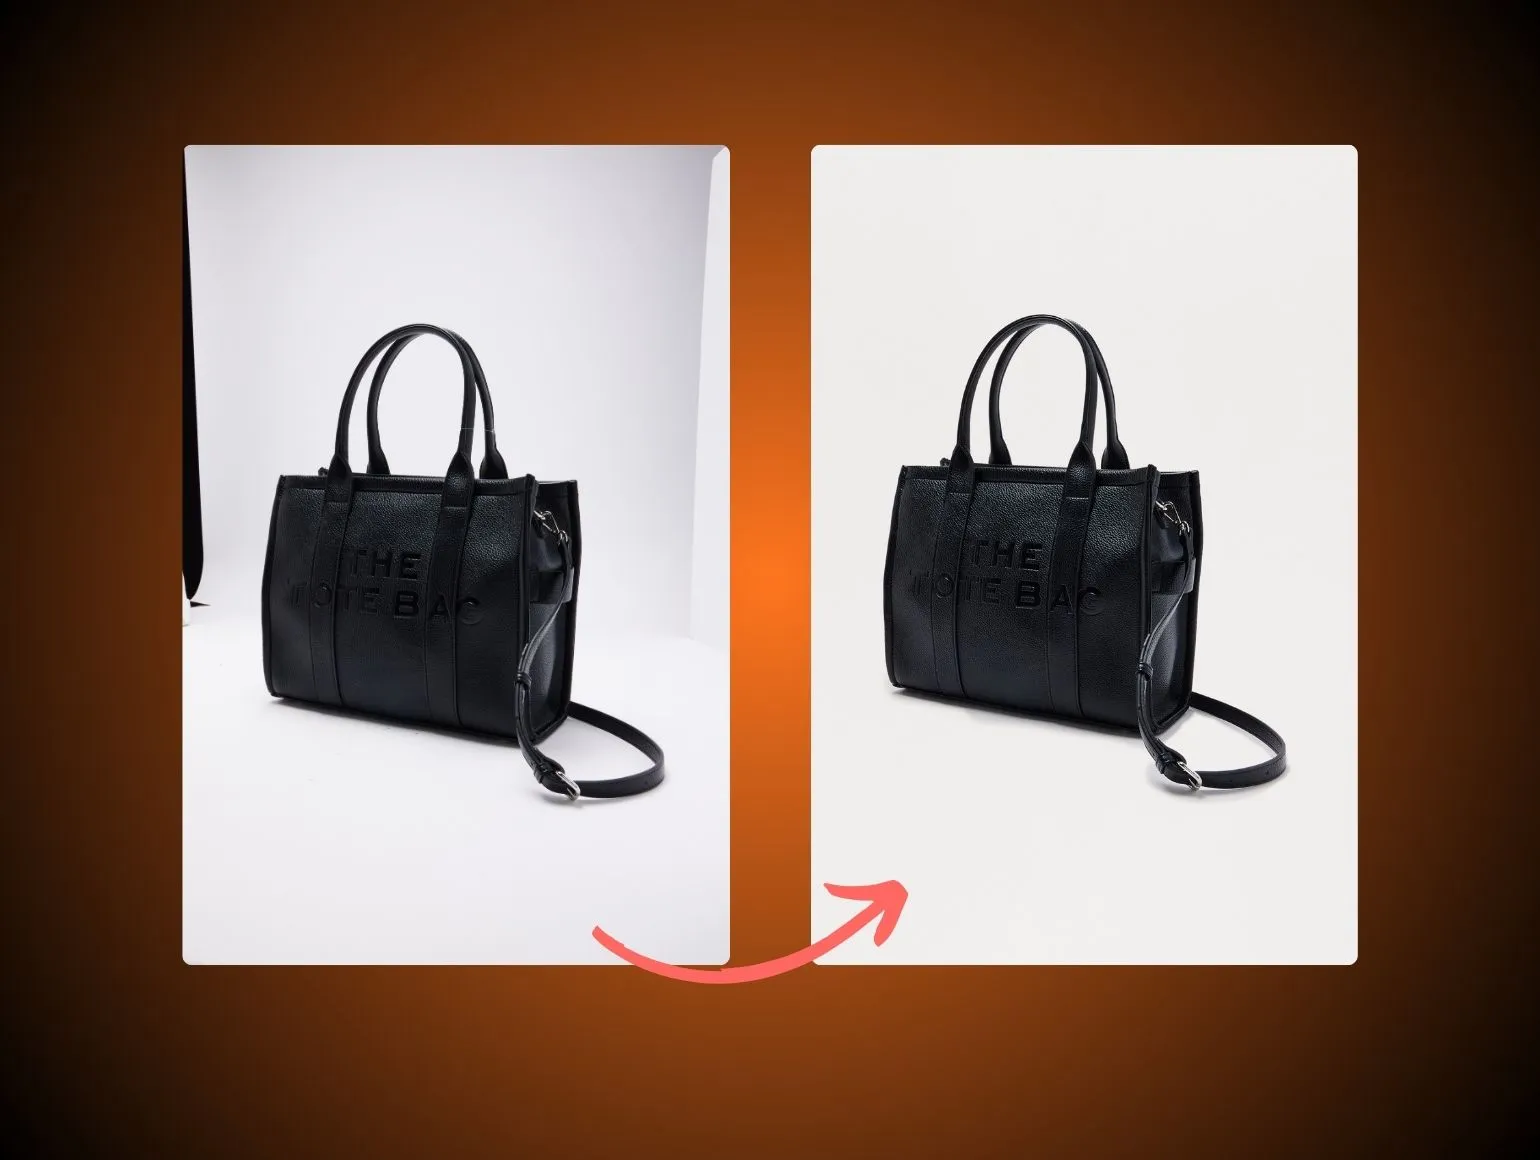
Prevent Lighting and Color Drift
Color drift across batches is one of the fastest ways to lose shopper trust. If red appears different between XS and XL or between main and zoom views, returns increase and size confidence drops. Lighting drift does similar damage, because changes in contrast and saturation make fabrics appear stiffer or softer than they are.
Here the hybrid workflow matters. AI can generate on-body variations rapidly, yet you still need human QC loops to normalize white balance, exposure, contrast, and color profiles across an entire release. AI tools perform reasonably well when you produce a handful of on-model images, but once you push into catalog volumes you see changes in lighting, skin tone, neckline geometry, ghost mannequin shoulders, and garment proportions from set to set. Pixofix combines AI production speed with a network of over 200 retouchers across US, EU, and Asia to correct that drift, so brands get fast output without sacrificing catalog-level consistency.
Size Inclusive Product Photography at Catalog Scale
Plan for 500 to 10,000 Plus SKUs
You cannot scale size inclusive product photography by copying hero-shoot habits. You need industrial planning. Batch SKUs by fabric type, pattern family, and silhouette, not only by themed collection. Assign each batch a predictable capture recipe and post-production recipe, documented in a living style guide.
At 500 to 10,000 plus SKUs per month, small inefficiencies multiply into post-production bottlenecks. If your workflow demands manual reinvention for every silhouette, SLA adherence will swing and launch dates slide. Plan capacity by batch complexity, not just SKU count. Give retouch and AI teams enough notice and time to keep image quality and fit accuracy stable as volume scales.
Match Throughput to Launch Calendars
Marketing calendars often assume infinite studio capacity. Production does not. If your PDP images must reflect accurate fit across complete size runs, treat throughput as a shared constraint among ecommerce, creative, and operations. Compressing all work into a single pre-launch crunch is a predictable route to QC failures.
Design a staggered workflow. Capture base imagery first. Run AI creation on extended size views next. Then leave human retouch and QC enough buffer to fix systemic issues before PDP build. Vendors that specialize in hybrid AI plus human pipelines already work this cadence. Pixofix, for example, has processed more than 5 million ecommerce images on 24 to 48 hour delivery SLAs, so its teams are organized for predictable batch turnaround instead of last-minute rescue missions.
Build Batch-Level Quality Checks
Reviewing one beautiful PDP at a time is comforting and misleading. Size inclusive product photography problems appear when you scan horizontally across SKUs and sizes, not when you scroll down a single product. You need batch-level QC loops that inspect full size runs, entire category drops, and trend capsules to catch drift.
Implement automated checks for histogram consistency, skin tone mapping, background uniformity, and alignment, then layer human review for garment-specific issues such as collar symmetry, waistband twist, neckline height, and sleeve length. Integrate QC into your DAM or proofing system so issues surface early. Without this, misrepresentation only becomes visible after complaints, higher returns, or social commentary.
What Accurate Size Inclusive Product Photography Does to Returns
Return rate data is the clearest signal that size inclusive product photography is working or failing. Brands that have moved from single-model PDPs to anchor-model plus hybrid pipelines consistently see the same pattern: "did not match photos" and "fit not as pictured" return reasons drop first in extended sizes, where the visual gap between imagery and reality was largest.
The mechanism is straightforward. When a size 18 shopper sees a PDP image that was generated by scaling a size 4 shoot, the waistband sits differently, the bust ease reads differently, and the hem break does not match what they would see on their own body. They may buy, but they return. When that same shopper sees imagery anchored to a real size 16 or 18 fit photo with consistent QC, conversion holds and returns fall.
Internally, the metric that predicts this improvement before it shows in returns is approval cycle time by size block. When extended size imagery stops generating disproportionate rework comments such as "fit looks off" or "shoulder seam is in the wrong place," the underlying pipeline is working. That leading indicator is worth tracking from the first batch of a new hybrid workflow.
Mistakes That Break Accuracy
Over-Relying on Thin-Model Imagery
Mistake: Using a single thin model as the default for all PDP imagery, then trying to simulate extended sizes with warps or generic AI prompts.
Consequence: Garments appear to fit identically across sizes, realistic tension points vanish, and shoppers in extended sizes feel visually misled. Returns concentrate around "fit not as pictured" and repeat purchase drops in those sizes.
Fix: Establish anchor models for key size blocks and body types, such as straight, curvy, petite, and tall. Use those anchors as ground truth for both capture and AI generation. Enforce realistic fit artifacts in retouch, including subtle creasing, waistband tension, and accurate hem breaks that differ by size block.
Using One Reference for Every Size
Mistake: Forcing one canonical sample image to represent every size by scaling or overlaying generic virtual models.
Consequence: Shoulder seams float, necklines climb or sink unpredictably, and sleeve and leg lengths contradict graded measurements. Extended sizes resemble enlarged versions of the smallest size instead of dedicated patterns.
Fix: Produce at least one fit-accurate reference for each size block. Use these references to steer manual adjustments and AI outputs. Then run batch QC across the full size run to ensure proportional rules hold and shoulder, waist, and hem positions track the measurement chart.
Ignoring Fabric Behavior in Retouch
Mistake: Treating all fabrics the same in retouch and AI, smoothing textures heavily to keep silhouettes clean and noise low.
Consequence: Stretch knits lose visible elasticity, rigid denim looks oddly soft, and compression garments look like basic bodycon instead of support pieces. Shoppers cannot read comfort, structure, or support from the imagery.
Fix: Calibrate texture handling by fabric family. Build fabric-specific style guides and train retouch teams and LoRA models with fabric references that show true behavior on different sizes. Preserve directional stretch cues, seam tension, micro-shadows, and subtle wrinkling that indicate real performance on the body.
Size Inclusive Product Photography Workflow Checklist
Pre-Shoot Preparation
Define your size blocks, base sample sizes, and anchor models before the first frame. Align design, merchandising, and studio on which silhouettes will require genuine extended-size capture versus digital augmentation. Lock technical parameters such as camera height, distance, lens, and lighting ratios into a capture guide that production teams can follow under pressure.
Assemble fabric and trim references for each major group. Plan ghost mannequin photography setups with shoulder and neckline geometry that can be repeated across size runs without ad hoc adjustment. Document styling rules that cannot cross into altering true fit, especially pinning, tucking, or clamping that hides graded differences.
Apply the production method decision matrix during line planning. Flag silhouettes that require full reshoot on anchor models versus those eligible for AI extension. Communicate these decisions to post-production intake before shoot day so teams are not making method choices under deadline pressure.
Post-Production Review
Route all imagery, both photographic and AI-generated, through a structured QC loop. Start with automated checks for exposure, color, composition, clipping paths, and alignment. Then add human review for fabric realism, body shape fidelity, pattern integrity, and color consistency across sizes and colorways.
Use trained retouchers to correct systemic issues such as plastic-looking skin under studio lighting, color drift across batches, neckline and shoulder distortion in ghost mannequin frames, and garment warping near joints or waistlines. At this stage, tools like Capture One and Photoshop combine effectively with AI pipelines from Flux Pro, Imagen 3, Stable Diffusion, or Runway Gen-4 to refine outputs. Providers that operate at catalog scale, including Pixofix with millions of images retouched under consistent 24 to 48 hour SLAs, typically bake these QC loops into their base service rather than treating them as add-ons.
Final PDP Readiness
Before marking a batch PDP ready, review horizontally across sizes and vertically across related products. Confirm that changing size on the PDP does not create sudden jumps in lighting, color tone, model body type, or camera angle. Check that ghost mannequin shots, detail views, and on-model images all agree on garment proportions and construction.
Run a targeted cross-check between graded measurement charts and what is visually implied on primary images. Correct hem lengths, waistband positions, neckline heights, and rise placement that might conflict with fit expectations. Once that pass is complete, release images into your DAM or ecommerce platform and sync merchandising, paid media, and email teams so that all outward-facing content reflects the same size-inclusive truth.
Measure What Improves Conversion
Track Returns by Size
Most teams track aggregate return rates. That hides fit problems. You need return data sliced by size code and reason, especially "too small," "too large," and "did not look like photos." Patterns here often expose visual issues rather than construction errors.
If a specific size shows higher "did not match images" returns, audit the PDP imagery across that size block. Look for subtle misrepresentation in ease, hem length, stretch, or rise. Adjusting imagery is frequently faster and cheaper than altering grading, and it generates improvement immediately for current inventory.
Watch PDP Engagement by Variant
Extended sizes frequently share the same imagery as core sizes, or get a single generic on-model shot while base sizes receive full coverage. Track engagement metrics such as clicks on variant thumbnails, changes in time on PDP after size selection, zoom usage, and scroll depth after the size picker is used.
If shoppers pick a size and quickly bounce or switch sizes, they are telling you the visuals do not feel reliable. When you add more accurate extended size imagery, watch for deeper scroll, higher zoom interaction, longer dwell time, and reduced size-switching or cart abandonment after size selection. These become leading indicators that your size inclusive product photography is improving fit confidence.
Review Approval Time and Rework Rate
Internally, your workflow health shows up in approval cycle time and rework rate. Track how long a batch takes to move from first delivery to final approval for all sizes, not just base shots. Track how many images get rejected or returned with comments such as "fit looks off," "lighting does not match last drop," or "color feels wrong."
Measure rework as a percentage of total images per batch. Measure days from shoot to PDP live per category. When you introduce a hybrid AI plus human QC model, expect first-delivery volume to rise. You should also expect rework on sensitive zones like ghost mannequin shoulders, hands, jewelry, and shiny fabrics to stay under tight human control. If rework rate does not decline over time, your style guide, AI prompt library, or QC steps are not yet aligned.


.png)
.png)